
The fishbone diagram is a simple tool that allows quick and effective root causes to be understood, in the pursuit of corrective actions.
Often referred to as a cause and effect diagram, or Ishikawa, it is a simple root cause analysis tool that is used for brainstorming issues and causes of particular problems and can and often is used in conjunction with the 5 Whys tool.
In a fishbone diagram, the various causes are grouped into categories and the causes cascade from the main categories, flowing towards the effect, forming what resembles a fishbone appearance.
The prime remit is to brainstorm all the possibilities that could cause the problem and then drill down to the factor(s) that are causing this issue. Once found, eliminate them. It enables the team to focus on why the problem occurs, and not on the history or symptoms of the problem, or other topics that digress from the intent of the session. It also displays a real-time ‘snap-shot’ of the collective inputs of the team as it is updated.
How to Conduct a Fishbone Diagram
Draw the box on the right of a flip chart or large dry wipe board, and write the problem statement in the box. Be as clear and specific as you can about the problem.
Now draw the line going from left to right as the ‘Spine’, connecting to the problem statement.
Draw the ‘fishbones’ emanating from the spine. These represent the main cause categories.
Now label each Fishbone category. There are two options here. You can use the generic cause categories of People, Method, Machine, Material, Environment, which is easier to use for a group that is relatively new to this exercise, or you can brainstorm the major categories related to the specific problem.
Now brainstorm all the causes to the problem. You could use the approach of writing each cause on post it notes, going around the group asking each person for one cause. Continue going through the rounds, getting more causes, until all ideas are exhausted.
For each cause, agree in the group which category the issue should fall in. (An issue can fall in a number of categories) and continue this process until the group have run out of ideas.
- Next, get each individual in the team in turn, to put a tally mark against the top three causes they think affect the problem. You can use supporting data to help you decide, if it is available.
- Once completed, the facilitator adds up all the tallies for each cause and selects the top three with the highest scores. These three issues will now form the basis of additional investigation in order to find the root cause. The team may then investigate these causes further and use problem-solving techniques like 5 Whys to eliminate their occurrences.
An example Fishbone Diagram
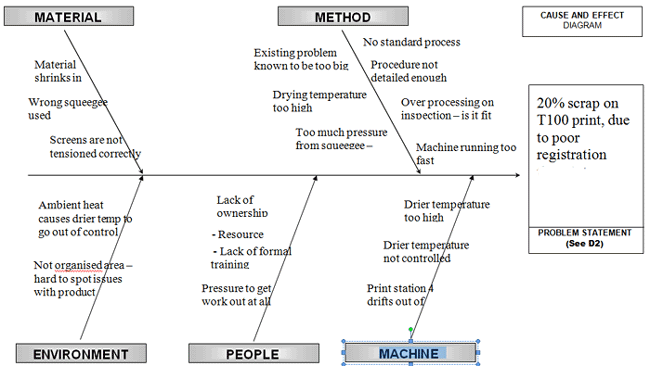
The group in the example below, had a problem with excessive scrap. They then got a cross functional team together to understand possible reasons, listing each possible cause into categories.
The next step would be to pick the top three causes and delve deeper to find the true root causes.
A Few Tips Along the Way
1. Remember, as with any task-based activity, always close the session off with actions and owners – “Who is doing what by when?” This is important, as it keeps the teams focused on the project.
2. Hold people accountable and summarise the event, including the actions and deliverables to take away.
3. Have regular reviews with the team in between events, checking for status against the action plan, and work ways of getting tasks back on track if they are falling behind schedule. Keep on top of everything!
4. Leave every task and bit of information clear and concise, so the team understands what is expected of them.
5. As a part of Visual Management, why not create and place a number of large Problem solving boards around the shop floor or in the office. Get the teams to start identifying day to day issues, using QCPC charts and then running quick problem solving sessions, using fishbone diagrams and 5 whys together, 3 times a month for the highest turnbacks on these QCPC charts. You will systematically be embedding a problem solving and continuous improvement culture without even knowing it!
Other Related Articles
- Kepner Tregoe Problem solving
- 5 Whys
- Six Sigma Tools
- Consensus Decision making
- TQM Tools
- Lean Manufacturing Principles
- 5 Step Approach
- Failure Mode effects Analysis (FMEA)
- 8D Problem Solving